


Let’s talk about gluten-free puff pastry. Yes, that buttery, flaky dough everyone thinks is off-limits when you’re going gluten-free. But guess what? It doesn’t have to be.

You don’t need wheat to get those signature layers and delicate texture. With the right techniques and a little patience, you’ll be biting into a golden, crisp, and gluten-free puff pastry that’s all yours. This is the gluten-free baker’s holy grail, and I’m here to help you tackle it.
Puff pastry is more than just a recipe; it’s a process. Sure, it takes time, a bit of finesse, and a few precise steps, but don’t worry—I’ve got you covered. By the end of this, you’ll have a gluten-free dough that holds up just like the real thing, begging to be transformed into turnovers, tarts, or savory hand pies. So, let’s roll up our sleeves and get to work.

What Makes Gluten-Free Puff Pastry Different?
Why does gluten-free puff pastry get such a bad rap? Mainly because traditional puff pastry relies on gluten to create that stretchy, foldable dough that puffs up into delicate layers. Gluten-free flours? Not so stretchy. But we’re not here for excuses; we’re here for results. To get those flaky layers without gluten, you need the right combination of ingredients and a few key tricks.
With gluten-free puff pastry, you’ll swap all-purpose flour for a high-quality gluten-free blend like King Arthur Measure for Measure, which helps mimic that gluten structure. You’ll also freeze the butter, and there’s a reason for that (spoiler alert: it’s all about layering). But before we dive into the details, let’s break down the core ingredients and why they’re essential.

Essential Ingredients for This Puff Pastry Recipe
Each ingredient plays a part in getting the structure, flavor, and texture that sets puff pastry apart. Here’s what you’ll need for my gluten-free puff pastry recipe:
Dough Ingredients
- Gluten-Free Flour Blend: Go for King Arthur Measure for Measure or another good quality blend. You want a mix that can withstand rolling and folding without crumbling apart.
- Sugar: Adds a hint of sweetness to balance the buttery flavor.
- Salt: A little goes a long way in bringing out the flavor.
Butter Block
- Frozen Butter: Irish butter, with its low moisture and high fat, is ideal. Freezing it before grating it into the flour helps keep those layers distinct and the dough cold, which is essential for puff pastry.
- Cold Water: Helps bring the dough together without softening the butter too much.
You might be wondering: why frozen butter? Why not just chilled? Well, in the world of puff pastry, the colder the butter, the better. When you grate it in frozen, you get fine shards of butter that create air pockets as the pastry bakes. That’s what gives you those flaky layers.
How to Make Gluten-Free Puff Pastry: Step-by-Step
Here’s where we get down to business. Follow these steps, and you’ll be well on your way to a homemade gluten-free puff pastry that rivals the gluten-filled version.


1. Mix the Dough
Start by whisking together your gluten-free flour, sugar, and salt. You’re creating a base that’ll hold up to multiple folds, and each ingredient adds to the structure. Then, get that frozen butter out of the freezer.
2. Grate the Butter
Using a box grater, grate the frozen butter into the flour mix. This may feel strange, but trust the process. As you go, toss the butter in the flour with a fork to keep it separated. You’re aiming for a blend that’s just incorporated but still has visible pieces of butter.
3. Add Cold Water Gradually
Now, you’ll add the ice-cold water a tablespoon at a time. Gently mix with a fork after each addition. You want the dough to just come together; overmixing is the enemy here. Once you’ve got a cohesive dough, knead it lightly with your hands, wrap it in plastic, and chill it for at least an hour. That downtime in the fridge is crucial—it lets the flour absorb the water and makes rolling out easier.


Rolling and Folding: Creating the Flaky Layers
The secret to puff pastry is in the folds. You’ll be rolling and folding the dough multiple times. Here’s the breakdown:
1. First Fold: Making the Letter Fold
After chilling, place your dough on a lightly floured surface and roll it out to about ¼ inch thickness. Then, fold the dough into thirds, like you’re folding a letter. Rotate it 90 degrees and roll it out again.
2. Repeat the Process
You’ll repeat this “letter fold” four times. The folding and turning of the cold dough creates those buttery layers, so don’t rush it. Think of it as building anticipation—the dough gets better with each fold.
3. The Final Chill
After your last fold, wrap the dough tightly and let it chill one last time before you start baking. This final chill is the moment of truth, allowing the butter and dough to really fuse and create those airy layers when baked.

Tips and Tricks for Perfect Gluten-Free Puff Pastry
Let’s face it—gluten-free puff pastry can be tricky, so here are some pointers to help you nail it.
- Use Cold Everything: Cold ingredients, cold surfaces, cold hands if you can manage it. Warmth is the enemy of puff pastry.
- Don’t Overwork the Dough: Keep a light hand; you want a dough that’s just barely combined.
- Experiment: If King Arthur’s Measure for Measure blend isn’t available, try another high-quality gluten-free flour. However, avoid blends heavy on rice flour alone—they tend to get crumbly.

What to Do with Gluten-Free Puff Pastry
You’ve gone through the work of making gluten-free puff pastry from scratch, so make it count! Here are a few ideas to help you decide how to use your masterpiece:
- Savory Tarts: Lay out the puff pastry, load it with cheese, vegetables, or herbs, and bake until golden. It’s easy, delicious, and perfect for a party.
- Turnovers: Fill your puff pastry with fruit or savory fillings for a quick snack or dessert.
- Pastry Shells for Tarts or Quiches: This gluten-free puff pastry makes an incredible crust. Bake it up and fill it with whatever you fancy.
- Hand Pies: Perfect for on-the-go snacking. Use the dough to wrap the fillings of your choice and bake.
- Classic Palmiers: Just sprinkle with sugar, fold, slice, and bake. Simple yet so satisfying.

Troubleshooting Gluten-Free Puff Pastry
Not every puff pastry attempt goes smoothly. Here’s a quick troubleshooting guide for common puff pastry problems:
- Butter Melts into Dough: If the butter is seeping out or the layers aren’t forming, your dough might be too warm. Stick it in the fridge to firm up.
- Dough Won’t Hold Together: Add a little more cold water, a tablespoon at a time, until it’s cohesive but not sticky.
- Layers Look Flat: This usually happens if you skip part or all of the chill period. The colder the dough, the better it puffs.

There you have it—an in-depth, foolproof guide to making gluten-free puff pastry that actually puffs. It’s a process, yeah, but one that’s worth every step. You’ve got all the tools and tricks here to tackle puff pastry like a pro. So, take that dough, roll it out, and show the world just how flaky, golden, and absolutely delicious gluten-free can be.
Don’t forget to share your creations in the comments with me—whether it’s a tart, a turnover, or a buttery Danish, I want to hear all about it. Happy baking!

Gluten Free Puff Pastry
Ingredients
For the dough:
- 2 cups gluten-free flour we used King Arthur Measure for Measure
- 3 tsps sugar
- ¼ teaspoon salt
- 1 cup butter frozen, we used Irish butter which has a lower moisture content.
- 10-12 tablespoon ice cold water
Instructions
To make the dough:
- Combine the gluten-free flour, sugar, and salt in a large mixing bowl with a whisk.
- Retrieve the frozen butter from the freezer and grate it directly into the flour mixture. Work in batches, grating the butter a little at a time.
- Between batches, gently toss the grated butter with the flour mixture using a fork, ensuring it is evenly coated with flour.
- Gradually add cold water to the flour-butter mixture, one tablespoon at a time, while mixing with the fork.
- Use the fork to gently incorporate the water into the flour mixture until a dough starts to form. Be careful not to overwork the dough.
- Once the dough begins to come together, use your hands to lightly knead it until it forms a cohesive ball. If the dough is too dry, add a bit more cold water, a tablespoon at a time.
- Wrap the dough in plastic wrap, ensuring it is tightly sealed, and refrigerate it for at least 1 hour to allow it to firm up.
- After chilling, remove the dough from the refrigerator and place it on a lightly floured surface.
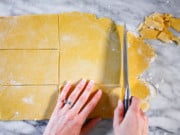
- Roll out the dough into a roughly ¼ inch thick rectangle using a rolling pin.
- Perform the first letter fold: Fold the bottom third of the dough up over the middle third, then fold the top third down over the other two-thirds, like folding a letter.
- Rotate the dough 90 degrees so that the folded edge is on your left and the open edges are on your right.
- Roll out the dough again into a rectangle, repeating the process until you have completed a total of four-letter folds.
- Wrap the dough in plastic wrap again and refrigerate it for at least 1 hour to allow it to chill.
- After chilling, your gluten-free puff pastry dough is ready to use in your desired recipe. Roll it out according to the instructions in your recipe, bake, and enjoy!
Notes
Store wrapped in plastic in an airtight container for up to 2 days in the refrigerator.
Nutrition
Use this gluten-free puff pastry recipe to make these:

Prune Onion Fontina Puff Pastry Tarts
Our friend Becky's Prune Onion Fontina Puff Pastry Tarts are a journey of sweet and savory satisfaction. Puff pastry squares get a dose of tangy grainy mustard, then a prune and onion mix and a delicate shower of fontina cheese.
Savory California Apple Tart Bites
California Grown's easy Apple Tart Bites are a feast for the senses, combining tart Granny Smith apples from California with sweet, crispy onion, fragrant rosemary, and buttery puff pastry. They’re a little sweet, a little savory, and will certainly be a crowd favorite.

FAQs About Gluten-Free Puff Pastry
Q: Can I freeze gluten-free puff pastry dough?
Yes, wrap it tightly in plastic wrap and freeze for up to two months. Let it thaw overnight in the fridge before using.
Q: Do I really need to grate the frozen butter?
Grating the butter might seem strange, but it’s essential. You want those tiny butter pieces layered within the dough to create air pockets as it bakes.




Let Us Know What You Think